Battery powered esp8266 - part 1
I wanted a thermometer to measure the temperature outside that would store the collected data and did not require drilling holes and runing wires through the house. No being able to find anything at the local shops to satisfy me I set out to build one myself. This will be a post on esp8266 and how to run it on a lithium battery …
UPDATE 2017-08-25 Linked to nodemcu doc page for flashing the device
Esp what ?
First challange was finding a device capable of connecting to the internet and commanding a few sensors. As most techies I’ve heared of adruino and raspbery pi, but this project required something far more basic and hopefully more battery friendly. Alter doing the research I stumbled upon ESP8266. This is a chinese device with wifi, tcp stack, high level programming language all in a very compact package.
Since its appearence in 2014 it gained a lot of popularity, testimony to that being the multitude of articles, projects and resources. Read more about the device on the wikipedia page link
The requirements
Cool new gadget found … check, next doind something useful with it:
The requirements for this project.
- Theromometer
- Measures temperature in multiple zones like inside/outside
- Runs on battery and has decent authonomy (minimum one month)
- Collects data and stores it somewhere on the internet
- Companion application to draw nice graphs and stats
- Possibility to add other types of sensors in the future
The esp8266 basics
There are a couple of versions of the device out there and even more prototype boards. It is quite a challange to get specific details about each and choosing one. The mainstream device nowdays is called ESP-12F and in its barebone form looks like this this.
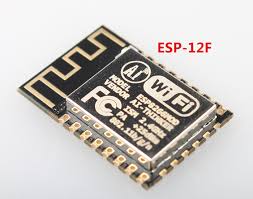
Running the device requires a few components: resitors, 3v power supply, usb to ttl converter for programming. While it is not the most noob friendly way of working with it is doable provided one has basic electronics, here’s a very good article on how to get started on this path link
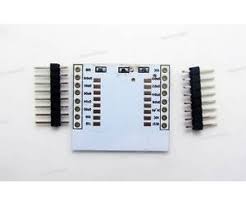
Next step up is using an adator board, this will provide breakout pins and the passive components (two resistors) and a place to solder a voltage regulator. Looks like this:
Esp development boards
There is still an even more convenient way of using this device, that is with a development board. The development board will contain the device, the usb programmer, and a voltage regulator. The usb programmer provides the means to program the device. The voltage regulator will allow for a wider power supply voltage range, like 5v from pc or 3.7v from a lithium battery since the device runs on 3.3v. With a development board all I have to do is to plug in the device to a pc.
I found two variants sold at a local dealer. The lolin nodemcu v3, and the wemos d1 mini. If you live in Romania have a look here. Not the chinese wholesale prices but for a couple of extra lei you’ll get the device in 2-3 days. These two turned out to be quite different.
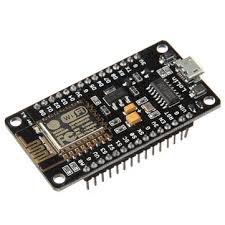
The lolin nodemcu v3
The lolin has a lot of pins but definitely cannot be run on battery because it uses the AMS1117 voltage regulator that has a dropout voltage in the range on volts, and quiescent current in the range of a few milliamps. Here’s the datasheet link
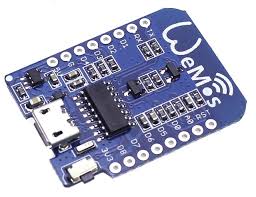
The wemos d1 mini
The wemos is much more compact and better suited for battery applications. Wemos has a website link, even builds arduino style shileds for the device and provides the schematics for all the boards. The schematic reveals that the voltage regulator is RT9013 which as just a 250mV dropout voltage and much lower quiescent current. Here’s the datasheet link
Later on I found this very good article that lists the device types and most common boards: link
Programming
There is more than one way to programm this device. First there is an oficial c based sdk so it can be programmed in c, there is also firmware that will make it arduino compatible so it can be programmed like an arduino device. It can run micro-python, and it can run lua, another high level progamming language. I ended up using lua/nodemcu.
Lua is a scripting language designed for devices, and a couple of folks implemented the specs for this device. The firmware is called nodemcu.
Start learning about nodemcu here. Documentation is good, firmware is modular and a lot of modules to choose from.
Before writing the first program in nodemcu/lua the following need to happen:
- Install a flasher PyFlasher or nodemcu flasher, this will flash the device with the nodemcu firmware, check this link for latest developments regarding flashing
- Install a tool for uploading code: esp explorer ide or nodemcu-uploader.py
the basic of all these are covered in the nodemcu documentation.
In the next post I’ll be showing the device prototype, the experiments with running it on battery and some lua code.