Weather station
Weather station IOT project with esp8266 and mqtt
The project
I put together a simple weather station using esp8266. This was an educational project made together with highscool students.
The weather station is using an Esp8266 processor with attached sensors to read atmospheric pressure, temperature and humidity. Sensors are read every hour and the data sent over wifi to an online mqtt broker. On the other end hook up one of the multitude of existing mqtt client app to receive and display the data.
Plenty of weather station project out there already, still thought it would be intesting to be able to collect and analize weather data exactly from your location.
Shopping list
| Part | Price (usd) | Note |
|---|---|---|
| Esp8266, wemos d1 mini | 3 | |
| Battery shield | 2.7 | |
| Bmp 280 air pressure sensor | 1 | |
| Dht22 temperature and humidity sensor | 1.86 | |
| 18650 lithium battery | 0 | salvage from old laptops |
| Diy enclosure | 0 | scrap wood and plastic |
The esp, battery shield and sensors I bought from aliexpress, from this seller.
The rest you can gather for free with a bit of luck.
Assembly
To assemble the thing use this diagramm.
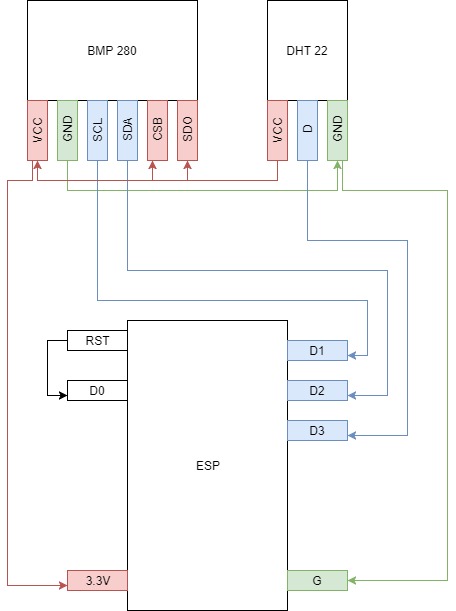
The dht22 requires three wires, ground, vcc and d3 pin for signal
The bmp280 has 6 pins but requires 4 wires, vcc, power, d1 (to scl) and d2 (to sda) for signal, csb and sd0 are connected to vcc
The deepsleep feature requires pins D0 and Rst to be connected
Challanges
Mqtt session management
That is having the broker store messages while the client is offline and deliver the missed messages once it comes back online. Basically it’s accomplished by connecting both publisher and subscriber to the broker with QOS > 0 and the subscriber using the Clean Session = false
Follow this very good article for mot information on this.
Keeping time with Esp8266
The mqtt protocol does not deal with time in any way so if time if of interest it has to be proveded in the message.
Nodemcu documentation once again to the rescue. The rtctime and sntp modules provide a readily available solution to feed the esp with the current time.
Basically specialized servers provide the current time to any device though the sntp protocol. When the esp connects to the internet if will first enquire for the time then pass this information together with the sensor data in the mqtt message payload.
More information on sntp protocol
- Read the nodemcu module documentation for more details here
- The list of ntp servers can be found here
- Finally a wiki page describing the protocol here
Setting up the mqtt broker
I used cloudmqtt. Link here. It has a free plan for limited number of devices.
The settings can be found in the control panel / console
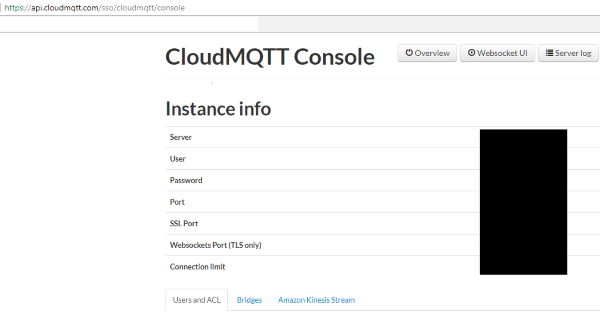
Aditionally the websockets ui provide a way to send messages, this is usefull for testing, same as the server logs screen.
The code
Explanation of what the code does. First load the settings from a separate file. Set up and initiate the wifi connection. A timer is used to periodically check the connection status. Timeout occurs after about 10 seconds in which case the device goes to sleep.
On successfull wifi connection, the current time is retrived, connection estabilished to the mqtt broker, and sensor and time data sent. The topic address contains the device unique id. Once done the device goes to sleep.
To execute the code automatically an init.lua file is required, which I did not list since it can be a one liner like dofile(“main.lua”)
main.lua
print("wake")
dofile("settings.lua") -- stores the configuration settings

wifi.setmode(wifi.STATION)
wifi.setphymode(wifi.PHYMODE_N)

station_cfg={}
station_cfg.ssid=WIFI_SSID
station_cfg.pwd=WIFI_PASS
wifi.sta.config(station_cfg)
wifi.sta.connect()

retries = 0

mytimer = tmr.create()
mytimer:register(1000, tmr.ALARM_AUTO, function()  verifConnect() end)
mytimer:start()

function verifConnect()

    connected = wifi.sta.getip() ~= nil
    timedOut = retries > 10

    if(connected) then
        print("wifi connected")
        tmr.unregister(mytimer)
        mqttConnectAndSend()
    end

    if (timedOut) then
        tmr.unregister(mytimer)
        print("wifi timed out")
        rtctime.dsleep(OPT_SAMPLING)
    end
    retries = retries + 1
end

function mqttConnectAndSend()

    sntp.sync("ro.pool.ntp.org", function(sec, usec, server, info)

        time = rtctime.epoch2cal(rtctime.get())
        string_time = string.format("%04d/%02d/%02d %02d:%02d:%02d", time["year"], time["mon"], time["day"],time["hour"], time["min"], time["sec"])

        mqtt = mqtt.Client(node.chipid(), 120, MQTT_USER, MQTT_PASS)
        mqtt:on("connect", function(con) print ("mqtt connected") end)
        mqtt:on("offline", function(con) print ("mqtt offline") end)

        mqtt:connect(MQTT_SERVER, MQTT_PORT, 0, function(conn)
            temp, humi, pressure = readSensors()
            --format as json if you preffer
            mqtt:publish("nodemcu/"..node.chipid() , string_time..";"..temp..";"..humi..";"..pressure, 1, 0, function(conn)
                node.dsleep(OPT_SAMPLING)
            end)
        end)
     end,
    function()
        print('failed!')
    end)
end


function readSensors()
    bme280.init(2,1)
    bmeT, bmeP, bmeH, bmeQNH = bme280.read(LOC_ALTITUDE)
    dhtStatus, dhtTemp, dhtHumi = dht.readxx(3)

    return dhtTemp, dhtHumi, bmeQNH/1000
end
settings.lua
WIFI_SSID = "" --your wifi ssid
WIFI_PASS = "" --your wifi pass

MQTT_SERVER = "" --mqtt server address ex: m20.cloudmqtt.com
MQTT_PORT = 0    --mqtt server port: ex 16691
MQTT_USER = ""   --mqtt server user
MQTT_PASS = ""   --mqtt server password

LOC_ALTITUDE = 0 --the location altitude (for pressure sensor) ex: 300
OPT_SAMPLING = 3600000000 --1hour
The final product
Everything put together:
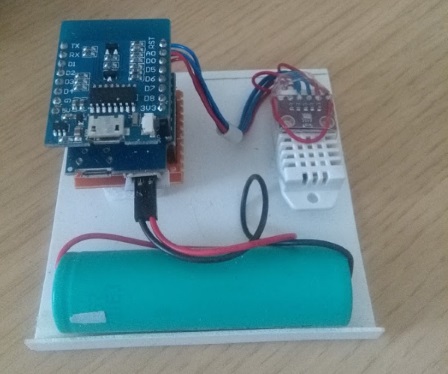
Esp on the top for easy access to programming interface and rest button. Battery shield in the middle and sensor wiring bord at the bottom. The two sensors are packed together and placed separately for better air flow.
.. and the enclojure. The board sits at the bottom. This one is somewhat weather proof and better aerated as it sit outside. Alternatively use a cheap white plastic box.

For questions and comments use the discussion form. Have fun.